I’ve seen too many homeowners ignore a small drip until it turns into a $3,000 repair bill.
You’re dealing with a water issue right now. Maybe it’s a faucet that won’t stop dripping or water pressure that suddenly dropped. You want to fix it yourself before calling a plumber.
Here’s the thing: most common water problems are easier to solve than you think. But wait too long and that minor annoyance becomes major damage.
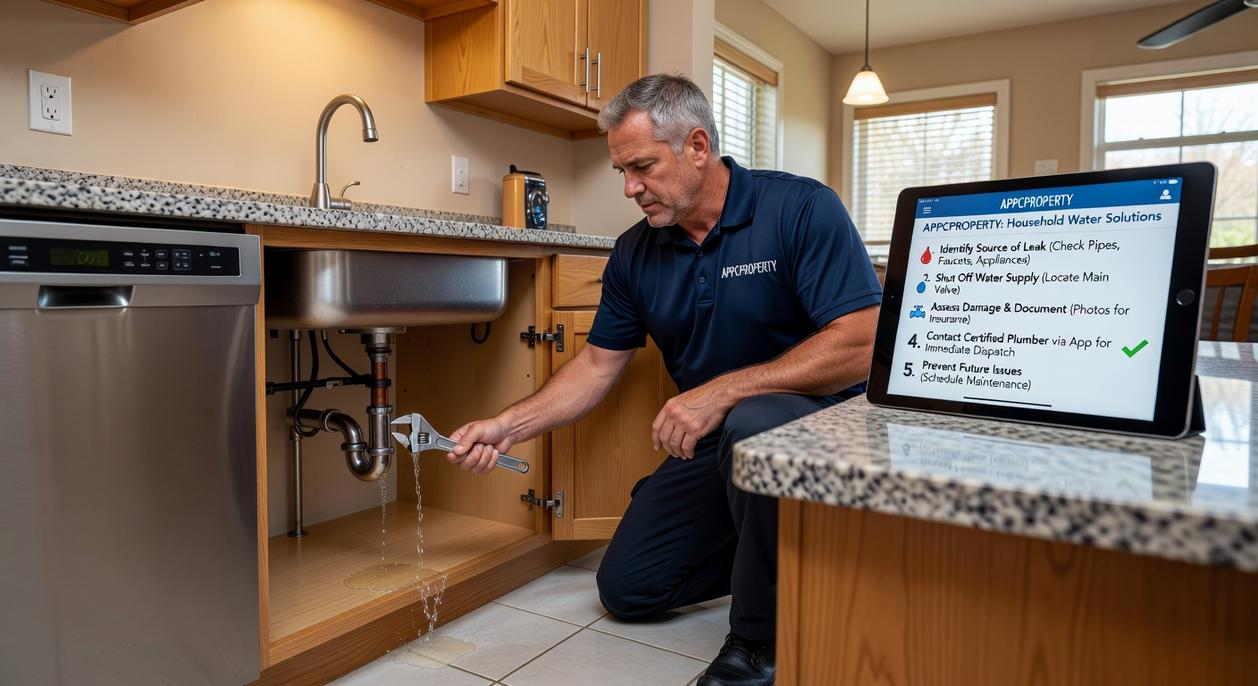
I manage properties across Chicago and I’ve dealt with just about every water issue you can imagine. Leaky pipes, running toilets, pressure problems. I’ve learned which ones you can handle yourself and which ones need a pro.
This guide shows you how to deal with household water problems appcproperty owners face every day. I’ll walk you through diagnosing what’s actually wrong and fixing it before it gets worse.
You’ll get step-by-step solutions for the most common issues. No technical jargon. No expensive tools you’ll only use once.
These are the same fixes I’ve used in dozens of properties. They work because they’re based on real problems, not theoretical scenarios.
Your water bill will thank you. So will your wallet.
Step 1: Become a Water Detective – Pinpointing the Source
You can’t fix what you can’t find.
I learned this the hard way back in 2018 when my water bill jumped $80 in a single month. I walked around my house for two weeks looking at faucets and checking toilets. Found nothing.
Turns out the leak was behind a wall the whole time.
Here’s what I should have done first.
The Water Meter Test
This takes about an hour but it’ll tell you if you actually have a leak.
Turn off every water source in your house. Dishwasher, washing machine, ice maker, everything. Make sure nobody flushes a toilet or turns on a faucet.
Go to your water meter and write down the exact reading.
Wait one hour. Don’t use any water during this time (I usually do this right before bed).
Check the meter again. If the numbers changed at all, you’ve got a leak somewhere.
Your Visual Inspection Checklist
Now you know there’s a leak. Time to find it.
Start with the obvious spots. Most leaks happen in the same places.
| Location | What to Look For |
|———-|——————|
| Under sinks | Wet cabinet floors, water stains, musty smell |
| Behind toilets | Pooling water, soft flooring, discolored baseboards |
| Water heater area | Rust spots, puddles, moisture on pipes |
| Appliance hookups | Wet floors near dishwasher, washing machine, refrigerator |
Check the walls around these areas too. A small dark spot or bubbling paint means water’s getting where it shouldn’t.
Listen for Clues
This sounds weird but it works.
Turn off everything in your house. I mean everything. No TV, no AC, no fans.
Stand still in different rooms and just listen.
You’re listening for the sound of running water when nothing should be running. It’s usually a soft hiss or a faint trickling sound.
Pay attention near bathrooms and kitchens. Put your ear against the wall if you have to (your neighbors might think you’re strange but who cares).
I found my 2018 leak this way. Heard a quiet rushing sound in the wall between my bathroom and bedroom. Turned out to be a supply line that had developed a pinhole leak.
If you’re dealing with how to deal with household water problems appcproperty issues can get complicated fast. Sometimes you’ll do all this and still come up empty.
That’s when you might need to call someone with better tools than your ears.
Common Culprit #1: The Relentless Drip of a Leaky Faucet
You’ve got two choices when your faucet starts dripping.
Option A: Call a plumber and pay $150 to $300 for a 20-minute job.
Option B: Fix it yourself for about $5 and learn something useful.
Most people think faucet repair is complicated. It’s not. About 90% of drips come from one thing: a worn-out washer or O-ring (basically a tiny rubber seal that costs less than a coffee).
Here’s how to deal with household water problems appcproperty owners face all the time.
What You’ll Need:
- Flathead screwdriver
- Adjustable wrench
- Replacement washers or O-rings
You can grab these at any hardware store. The whole kit costs maybe $10 if you don’t already have the tools.
The 5-Step Fix:
- Shut off the water supply under the sink (turn the valve clockwise until it stops)
- Disassemble the handle by removing the decorative cap and unscrewing the handle screw
- Replace the worn part by swapping out the old washer or O-ring with a new one
- Reassemble everything in reverse order
- Test your work by turning the water back on and checking for drips
The whole thing takes about 15 minutes once you know what you’re doing.
If you’re choosing between compression faucets and cartridge faucets, compression types use washers while cartridge types use O-rings. Check which one you have before you buy parts.
Common Culprit #2: The ‘Phantom Flush’ of a Running Toilet
You know that sound.
That faint hissing or trickling noise coming from your bathroom at 2 AM. You’ve probably walked past it a dozen times thinking you’ll deal with it later.
Here’s what that little noise is actually costing you.
A running toilet wastes over 200 gallons of water every single day. That’s not a typo. Your water bill can jump $50 to $100 per month just from this one issue.
Most people don’t realize they have a problem until they open that bill and wonder what happened.
The Food Coloring Test
Before you call anyone, try this. Takes about 10 minutes.
Remove the toilet tank lid. Add a few drops of food coloring to the water inside. Any color works.
Now wait. Don’t flush. Just wait 10 to 15 minutes.
Check the bowl. If you see colored water appearing without flushing, your flapper is leaking. Water is constantly draining from the tank into the bowl, and the fill valve keeps running to replace it.
Three Fixes You Can Do Right Now
The float might be set too high. Look inside the tank while it’s filling. If water is flowing into the overflow tube (that vertical pipe in the center), your float needs adjustment. Most modern toilets have a clip or screw you can adjust to lower the water level.
Check the flapper chain. It connects the flush handle to the rubber flapper at the bottom of the tank. If it’s tangled or too short, the flapper can’t seal properly. Give it a little slack but not so much that it gets caught under the flapper.
Replace the flapper itself. This is the most common fix. Flappers cost about $5 at any hardware store. Turn off the water supply valve (usually behind the toilet), flush to empty the tank, unhook the old flapper, and snap the new one in place.
I’ve seen people put off this repair for months because they think it’s complicated. It’s not. You can learn how to deal with household water problems appcproperty without spending hundreds on a plumber.
That hissing sound? It’s literally money going down the drain.
Fix it today and watch your next water bill drop back to normal.
Troubleshooting Low Water Pressure
You turn on the faucet and get a weak trickle.
Frustrating, right?
I see a lot of homeowners panic when this happens. They immediately think it’s a major plumbing disaster and start calling professionals.
Some plumbers will tell you that DIY fixes are always a bad idea. They’ll say you should call an expert for any water pressure issue because you might make things worse.
And look, I understand where they’re coming from. If you mess with the wrong valve or crack a pipe, you’re in for a bad time (and a bigger bill).
But here’s what they don’t mention.
Most low water pressure issues are simple fixes that take five minutes. Calling someone out for a $200 service call to unscrew an aerator? That’s just throwing money away.
The key is knowing when to DIY and when to stop.
Start by isolating the problem. Turn on different faucets around your house. Is it just one sink or shower? Or is every fixture running weak?
If it’s a single faucet, you’re probably dealing with a clogged aerator. That’s the little screen at the tip of your faucet. Mineral deposits build up over time and choke the flow.
Unscrew it (usually by hand or with pliers and a rag). Rinse out the gunk. Screw it back on. Done.
Whole house pressure is different. First, check your main shutoff valve. Make sure it’s fully open. Sometimes it gets partially closed during repairs and nobody notices.
Next, look at your pressure reducing valve if you have one. It’s usually near where the main water line enters your house. If it’s set too low or failing, that’s your culprit.
Here’s where you need to be honest with yourself. If you’re not comfortable adjusting the PRV or you can’t find the problem, stop. Call someone who knows how to deal with household water problems appcproperty.
I’d rather you spend money on a pro than flood your basement trying to save a few bucks.
Proactive Defense: Preventing Future Water Damage
I learned this the hard way back in 2018.
Came home after a weekend trip to find water pooling under my kitchen sink. The supply line had been leaking for who knows how long.
Could’ve caught it weeks earlier if I’d just looked.
The Monthly Walk-Through
I spend 15 minutes once a month doing a quick check. Under every sink, behind the washing machine, around the water heater. I’m looking for moisture, stains, or anything that feels off.
It sounds boring (because it is). But finding a small drip now beats dealing with a flooded basement later.
Know Your Main Shutoff Valve
Here’s something most people don’t think about until it’s too late.
Where’s your main water shutoff valve?
I make sure everyone in my house knows exactly where it is and how to turn it off. When a pipe bursts at 2 AM, you don’t have time to search YouTube for instructions.
Mine’s in the basement near the water meter. Takes about three seconds to shut off if I need to.
Seasonal Maintenance
Every fall, I disconnect my outdoor hoses and drain the spigots. Takes maybe 10 minutes total.
Why? Because frozen pipes are expensive. I’ve seen what happens when water freezes inside a pipe and splits it wide open. Not pretty.
These aren’t complicated real estate tips appcproperty owners need advanced skills for. Just basic habits that save you from expensive repairs down the line.
The best time to learn how to deal with household water problems appcproperty is before you actually have them.
From Worried Homeowner to Water-Wise Hero
You now know how to spot and fix the most common water problems in your home.
Those small drips and pressure drops you’ve been ignoring? You can handle them before they turn into expensive disasters.
I’ve seen too many homeowners wait until a minor leak becomes a major repair bill. You don’t have to be one of them.
This proactive approach saves you real money. Your water bills stay low and you avoid those emergency plumber calls that drain your wallet. Plus you’re protecting your property’s value.
Here’s what matters: how to deal with household water problems appcproperty gives you a reference you can return to whenever something seems off.
Keep this guide handy. Check your fixtures regularly and act fast when you notice changes.
Your home stays dry. Your bills stay manageable. And you sleep better knowing you’ve got this covered.
Start with a quick inspection this weekend. Walk through your home and look for the warning signs we covered. Catch problems early and you’ll thank yourself later.
 Eryk Blaszczski